While reading Understanding the JVM – Advanced Features and Best Practices, Second Edition (in Chinese) recently, there is a guide in chapter one to build JVM from source. It is based on OpenJDK7, which only works when using a Java6/Java7 VM as build bootstrap. Java8 bootstrap has more strict code checks and will finally fail the build. So, I just switched to a more recent OpenJDK8 code. The file name is openjdk-8u40-src-b25-10_feb_2015.zip.
The code provides a better build experience, and compiles on my Linux box almost out of box. But remember, do not use a gcc compiler >= gcc-6. It defaults to C++14 and breaks the build. On macOS, the build scripts seem only support gcc. Actually, a clang compiler is required to build the objc code.
1. So the first step after downloading and unzipping the code, modify the configure script:
<__gnu_cxx::new_allocator<int>> = {<No data fields>}, <No data fields>},
members of std::_Vector_base<int, std::allocator<int> >::_Vector_impl:
_M_start = 0x804c040,
_M_finish = 0x804c04c,
_M_end_of_storage = 0x804c050
}
}, <No data fields>}
(gdb)
Under Ubuntu 14.04(Trusty), the 4.8 version of debug package should be installed:
1
# sudo apt-get install libstdc++6-4.8-dbg
There’s an additional step. Since GDB in Trusty is built with python3, not python2, and the python scripts for pretty printers are in python2 syntax. A simple conversion is required:
I’m running Ubuntu 12.04 as host, with VirtualBox 4.2.22. This tutorial should cover guests including Windows XP, CentOS and Ubuntu.
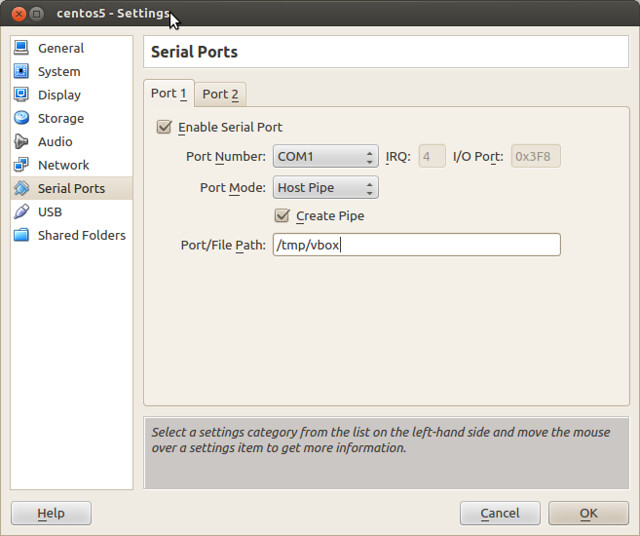
1. Settings in VirtualBox
In the settings page, Check “Enable Serial Port”, set “Port Number” to “COM1”. This is the port number in the guest. If the guest is a Linux, COM1 is shown as /dev/ttyS0, and COM2 is shown as /dev/ttyS1.
Set “Port Mode” to “Host Pipe”, check “Create Pipe” and set “Port/File Path” to “/tmp/vbox”. Seems it utilizes a named pipe. These settings work even if the host does not have a physical serial device.
2. Install minicom
1
2
# sudo apt-get install minicom
# sudo minicom -s
The second command setups minicom with an interactive menu. Select “Serial port setup”, and set “Serial Device” as “unix#/tmp/vbox”(without quotes). “Save setup as dfl” and “Exit from Minicom”.
3. Verity the serial device in guest
Now boot your Linux guest. Run the following command, and it should output something like:
werase = ^W; lnext = ^V; flush = ^O; min = 1; time = 0;
...
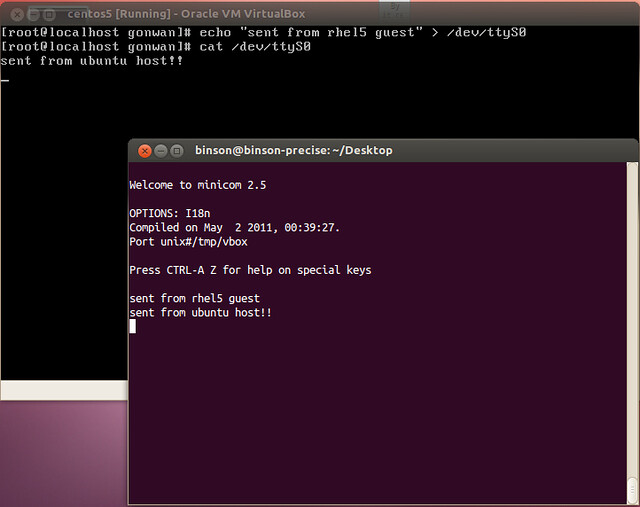
The guest here is CentOS5, and the serial device is /dev/ttyS0.
4. Communication via serial device
Start minicom on your host:
1
# minicom
Echo something from your guest and redirect to /dev/ttyS0. You host should get the message in minicom.
1
# echo "sent from rhel5 guest" > /dev/ttyS0
To read from the host, cat the device in guest so that you can do the input in minicom:
1
# cat /dev/ttyS0
5. Kernel configuration
CentOS5 comes with grub1, /etc/grub.conf is modified directly to allow the boot information to also be sent to our serial device. The original boot entry looks like:
That’s all for CentOS 5/6. There’s no need to modify /etc/inittab or /etc/securetty file as required in ArchLinux. These OS will do it for you.
Now, reboot your guest CentOS. The boot information should now displayed in your minicom. Finally, it will provide you with a login shell.
You can verify that there’s a new line added into /etc/inittab to enable getty(8) and execute a login shell:
1
co:2345:respawn:/sbin/agetty ttyS0 9600 vt100-nav
And ttyS0 is also added into /etc/securetty.
6. Ubuntu guest settings
Ubuntu 12.04 come with grub2. We do not modify /boot/grub/grub.cfg, we modify /etc/default/grub instead, so that the serial console parameters will remain even after you update your kernel. Open it, modify the following line to:
One additional step for Ubuntu, is to enable getty(8) for serial console by your own. Ubuntu uses upstart init system, we need to create a file called /etc/init/ttyS0.conf containing the following:
1
2
3
4
5
6
7
8
9
10
# ttyS0 - getty
#
# This service maintains a getty on ttyS0 from the point the system is
# started until it is shut down again.
start on stopped rc or RUNLEVEL=[12345]
stop on runlevel [!12345]
respawn
exec /sbin/getty -L 115200 ttyS0 vt102
Reboot you Ubuntu guest, and the serial device should work as it is with CentOS. More info, please refer to the official wiki.
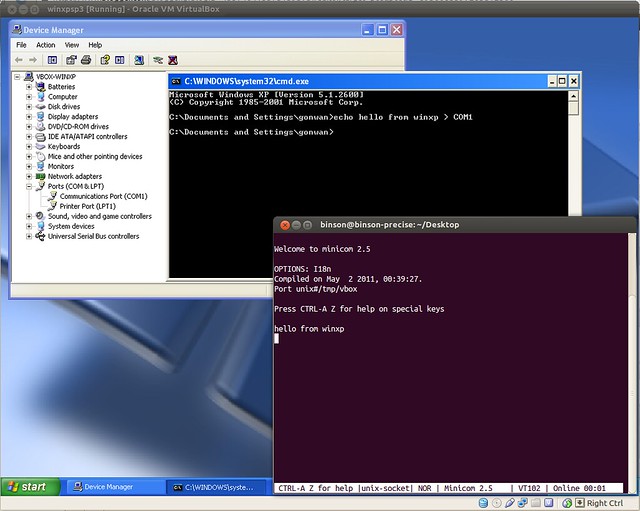
7. Windows guest settings
The serial device shows as COM1 in Windows XP as previously set. With a simple echo and redirect, our host can receive the message.
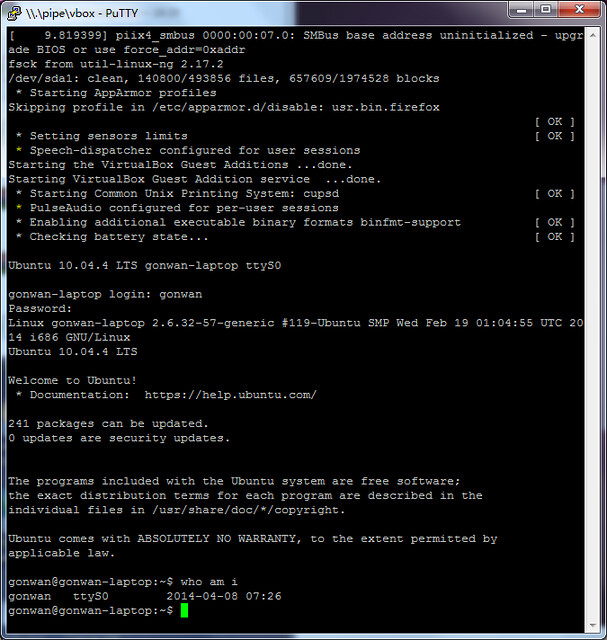
8. Windows as host
Settings of VirtualBox under Windows is almost the same as that under Linux. But we set “Port/File Path” to “\\.\pipe\vbox”, instead of “/tmp/vbox”. After the configuration of kernel and getty(8), we can use PuTTY to connect. Simply set “Connection type” to “Serial”, and “Serial line” to “\\.\pipe\vbox”.
In previous articles, I was not able to use Qt’s debug package provided by Ubuntu. Now, I will explain how to use them.
Our simple application:
C++
1
2
3
4
5
6
7
// main.cpp
#include <QtCore/QString>
intmain(){
QStrings="1234567";
inti=s.indexOf('3');
returni!=2;
}
Our *.pro file, you should enable the debug build:
1
2
3
4
5
6
# DebugQt.pro
TARGET = DebugQt
TEMPLATE = app
SOURCES += main.cpp
QT -= gui
CONFIG += console debug_and_release
1. Build your debug version of application:
1
2
# qmake-qt4
# make debug
2. Install Qt’s debug package:
1
# sudo apt-get install libqt4-debug
3. Install the Qt source:
1
# sudo apt-get source libqt4-debug
Now you can start debugging your application. Since Qt’s debug symbols are installed in /usr/lib, It does not follow the GDB’s global debug directory described here. We should tell GDB to load these symbols manually:
We set a breakpoint at the beginning of main function to load all shared libraries. Next, we will load symbols for libQtCore.so.4. The symbol will be loaded in the start address of it (0xb7652510):
From last blog, I’ve demostrated the usage of Ubuntu *-dbg packages. However, not all *-dbg packages seem to work as libssl0.9.8-dbg. For instance, libcurl3-dbg and libqt4-dbg packages do not work. I’m afraid some debug info are missing in these two packages. I’m not sure.
I googled a lot, but was not able to find a solution. So I decided to build the debug version of the two library myself. Here are steps for libcurl:
I use /usr/lib/libcurl.so.4 instead of lcurl, since lcurl will link the binary to /usr/lib/libcurl-gnutls.so.4. But I currently cannot afford it :(. Last, start our GDB:
Reading symbols from /home/gonwan/testgdb/testcurl...done.
(gdb) b 3
Breakpoint 1 at 0x8048572: file testcurl.c, line 3.
(gdb) r
Starting program: /home/gonwan/testgdb/testcurl
[Thread debugging using libthread_db enabled]
Breakpoint 1, main () at testcurl.c:3
3 curl_easy_init();
(gdb) s
curl_easy_init () at easy.c:372
372 if(!initialized) {
(gdb) bt
#0 curl_easy_init () at easy.c:372
#1 0x08048577 in main () at testcurl.c:3
(gdb)
It prints the backtrace now, though I’m not so accustomed to console debugging. I add the LD_LIBRARY_PATH environment to let our test program find our homemade version of libcurl.so.4. In fact, we can run ldd like following lines. You see the re-direction?
Later, I successfully made it possible to debug Qt source code in IDE. I chose QtCreator, since it has both windows and linux version, and it’s easy to install and configure. I also built my homemade version of Qt:
I only built the most common modules, excluding webkit, script, xmlpatterns, phonon, multimedia and declarative modules. It took only 25 minutes to finish (An entire build under windows may take 3 – 4 hours.). After all, start your QtCreator, create a Qt console project with the source below:
C++
1
2
3
4
5
6
#include <QtCore/QString>
intmain(){
QStrings="1234567";
inti=s.indexOf('3');
returni!=2;
}
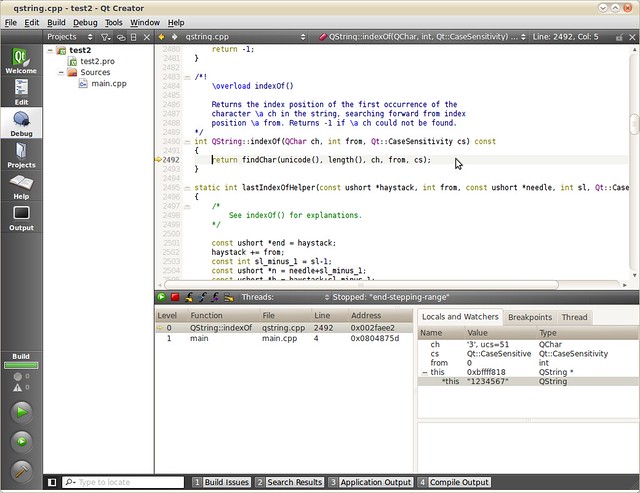
Build the project in debug mode. And now, here’s the magic: Go to Project tab –> Run Settings –> Run Environment, append our homemade Qt library path to LD_LIBRARY_PATH. In my example, it’s /home/gonwan/testgdb/qt4-x11-4.6.2/lib. Ok, you’re almost done! Go back to the Edit tab, set a breakpoint at line 4 (or line 3 as you like), press F5 to start debugging the project. Then continue pressing F11, you will find GDB has stepped into Qt source code! Let me take a screenshot:
In order to load our homemade *.so, we can also run “make install”.