1. Comments

When creating a shell script file, you must specify the shell you are using in the first line of the file. The format for this is:

In a normal shell script line, the pound sign(#) is used as a comment line. A comment line in a shell script isn’t processed by the shell. However, the first line of a shell script file is a special case, and the pound sign followed by the exclamation point tells the hell what shell to run the script under (yes, you can be using a bash shell and run your script using another shell).

2. Display

The echo command can display a simple text string if you add the string following the command.

The echo command uses either double or single quotes to delineate text strings. If you use them within your string, you need to use one type of quote within the text and the other type to delineate the string.

Notice that the environment variables in the echo commands are replaced by their current values when the script is run. Also notice that we were able to place the $USER system variable within the double quotation marks in the first string, and the shell script was still able to figure out what we meant.

You may also see variables referenced using the format ${variable}. The extra braces around the variable name are often used to help identify the variable name from the dollar sign.

User variables can be any text string of up to 20 letters, digits, or an underscore character. User variables are case sensitive, so the variable Var1 is different from the variable var1. This little rule often gets novice script programmers in trouble.

Values are assigned to user variables using an equal sign. No spaces can appear between the variable, the equal sign, and the value (another trouble spot for novices). Here are a few examples of assigning values to user variables.

The shell script automatically determines the data type used for the variable value. Variables defined within the shell script maintain their values throughout the life of the shell script but are deleted when the shell script completes.

Just like system variables, user variables can be referenced using the dollar sign. It’s important to remember that when referencing a variable value you use the dollar sign, but when referencing the variable to assign a value to it, you do not use the dollar sign.

The backtick allows you to assign the output of a shell command to a variable.

3. Redirect I/O

>: output redirect
>>: output redirect append data
<: input redirect
<<: inline input redirect

The inline input redirection symbol is the double less-than symbol (<<). Besides this symbol, you must specify a text marker that delineates the beginning and end of the data used for input. You can use any string value for the text marker, but it must be the same at the beginning of the data and the end of the data.

4. Math Expression

The expr command allowed the processing of equations from the command line. Note the spaces around operator is necessary. Escape character(backslash) is used to identify any characters that may be misinterpreted by the shell before being passed to the expr command.

Bash also provides a much easier way of performing mathematical equations. In bash, when assigning a mathematical value to a variable, you can enclose the mathematical equation using a dollar sign and square brackets ($[ operation ]).

The bash shell mathematical operators support only integer arithmetic. The most popular solution uses the built-in bash calculator, called bc.

5. Structured Commands

5.1 if/else

The bash shell if statement runs the command defined on the if line. If the exit status of the command is zero (the command completed successfully), the commands listed under the then section are executed. If the exit status of the command is anything else, the then commands aren’t executed, and the bash shell moves on to the next command in the script.

5.2 test

The test command provides a way to test different conditions in an if-then statement. If the condition listed in the test command evaluates to true, the test command exits with a zero exit status code, making the if-then statement behave in much the same way that if-then statements work in other programming languages. If the condition is false, the test command exits with a 1, which causes the if-then statement to fail.

*) Numeric Comparisons
Comparison Description
n1 -eq n2 Check if n1 is equal to n2.
n1 -ge n2 Check if n1 is greater than or equal to n2.
n1 -gt n2 Check if n1 is greater than n2.
n1 -le n2 Check if n1 is less than or equal to n2.
n1 -lt n2 Check if n1 is less than n2.
n1 -ne n2 Check if n1 is not equal to n2.

However, The test command wasn’t able to handle the floating-point value.
You may also notice usage of double parentheses. It provide advanced mathematical formulas for comparisons, no escape is needed in it:

Symbol Description
val++ Post-increment
val– Post-decrement
++val Pre-increment
–val Pre-decrement
! Logical negation
Bitwise negation
** Exponentiation
<< Left bitwise shift
>> Right bitwise shift
& Bitwise Boolean AND
| Bitwise Boolean OR
** Exponentiation
&& && Logical AND
|| Logical OR
*) String Comparisons
Comparison Description
str1 = str2 Check if str1 is the same as string str2.
str1 != str2 Check if str1 is not the same as str2.
str1 < str2 Check if str1 is less than str2.
str1 > str2 Check if str1 is greater than str2.
-n str1 Check if str1 has a length greater than zero.
-z str1 Check if str1 has a length of zero.

Trying to determine if one string is less than or greater than another is where things start getting tricky. There are two problems that often plague shell programmers when trying to use the greater-than or less-than features of the test command:
– The greater-than and less-than symbols must be escaped, or the shell will use them as redirection symbols, with the string values as filenames.
– The greater-than and less-than order is not the same as that used with the sort command.

The double bracketed expression uses the standard string comparison used in the test command. However, it provides an additional feature that the test command doesn’t, pattern matching. No escape is needed anymore.

Capitalized letters are treated as less than lowercase letters in the test command. However, when you put the same strings in a file and use the sort command, the lowercase letters appear first. This is due to the ordering technique each command uses. The test command uses standard ASCII ordering, using each character’s ASCII numeric value to determine the sort order. The sort command uses the sorting order defined for the system locale language settings. For the English language, the locale settings specify that lowercase letters appear before uppercase letters in sorted order.

While the BashFAQ said: As of bash 4.1, string comparisons using < or > respect the current locale when done in [[, but not in [ or test. In fact, [ and test have never used locale collating order even though past man pages said they did. Bash versions prior to 4.1 do not use locale collating order for [[ either. So you get opposite result when running on CentOS-5.7(bash-3.2) and Ubuntu-10.04(bash-4.1) with [[ operator. And bash-4.1 is consistent with sort command now.

5.3 case

Well, this is easy, just walk through the snippet:

All sample code are tested under CentOS-5.7 and Ubuntu-10.04.

In this first post of the series, some basic concepts are introduced. All information from Linux Command Line and Shell Scripting Bible, Second Edition.

1. Shell Types

There are three ways of starting a bash shell:
– As a default login shell at login time
– As an interactive shell that is not the login shell
– As a non-interactive shell to run a script

Login Shell

When you log in to the Linux system, the bash shell starts as a login shell. The login shell looks for four different startup files to process commands from. The following is the order in which the bash shell processes the files:

/etc/profile
$HOME/.bash_profile
$HOME/.bash_login
$HOME/.profile

Interactive Shell

If you start a bash shell without logging into a system (such as if you just type bash at a CLI prompt), you start what’s called an interactive shell. The interactive shell doesn’t act like the login shell, but it still provides a CLI prompt for you to enter commands.

If bash is started as an interactive shell, it doesn’t process the /etc/profile file. Instead, it checks for the .bashrc file in the user’s HOME directory.

Non-interactive Shell

Finally, the last type of shell is a non-interactive shell. This is the shell that the system starts to execute a shell script. This is different in that there isn’t a CLI prompt to worry about. However, there may still be specific startup commands you want to run each time you start a script on your system.

To accommodate that situation, the bash shell provides the BASH_ENV environment variable. When the shell starts a non-interactive shell process, it checks this environment variable for the name of a startup file to execute. If one is present, the shell executes the commands in the file.

2. Terminfo Database

The terminfo database is a set of files that identify the characteristics of various terminals that can be used on the Linux system. The Linux system stores the terminfo data for each terminal type as a separate file in the terminfo database directory. The location of this directory often varies from distribution to distribution. Some common locations are /usr/share/terminfo, /etc/terminfo, and /lib/terminfo.

Since the terminfo database files are binary, you cannot see the codes within these files. However, you can use the infocmp command to convert the binary entries into text.

The Linux shell uses the TERM environment variable to define which terminal emulation setting in the terminfo database to use for a specific session. When the TERM environment variable is set to vt100, the shell knows to use the control codes associated with the vt100 terminfo database entry for sending control codes to the terminal emulator.

3. Virtual Consoles

With modern Linux systems, when the Linux system starts it automatically creates several virtual consoles. A virtual console is a terminal session that runs in memory on the Linux system. Instead of having several dumb terminals connected to the PC, most Linux distributions start seven (or sometimes even more) virtual consoles that you can access from the single PC keyboard and monitor.

In most Linux distributions, you can access the virtual consoles using a simple keystroke combination. Usually you must hold down the Ctl+Alt key combination, and then press a function key (F1 through F8) for the virtual console you want to use. Function key F1 produces virtual console 1, key F2 produces virtual console 2, and so on.

4. Environment Variables

There are two types of environment variables in the bash shell:
– Global variables
– Local variables

Global environment variables are visible from the shell session, and from any child processes that the shell spawns. Local variables are only available in shell that creates them. This makes global environment variables useful in applications that spawn child processes that require information from the parent process.

Get

To view the global environment variables, use the printenv command.
To display the value of an individual environment variable, use the echo command. When referencing an environment variable, you must place a dollar sign($) before the environment variable name.

Unfortunately there isn’t a command that displays only local environment variables. The set command displays all of the environment variables set for a specific process. However, this also includes the global environment variables.

Set

You can assign either a numeric or a string value to an environment variable by assigning the variable to a value using the equal sign(=). It’s extremely important that there are no spaces between the environment variable name, the equal sign, and the value. If you put any spaces in the assignment, the bash shell interprets the value as a separate command.

The method used to create a global environment variable is to create a local environment variable and then export it to the global environment.

Of course, if you can create a new environment variable, it makes sense that you can also remove an existing environment variable. You can do this with the unset command.When referencing the environment variable in the unset command, remember not to use the dollar sign.

NOTE: When dealing with global environment variables, things get a little tricky. If you’re in a child process and unset a global environment variable, it applies only to the child process. The global environment variable is still available in the parent process.

Since the DVD size of CentOS 5.x is largely increased(1.7G for 3.x, 2.3G for 4.x, while 4.0G for 5.x), I decided to use the CD approach. I downloaded the first CD image from one of its mirror site: http://mirrors.163.com/centos/5.6/isos/i386/.

Now, follow the official FAQ here:

– You can do a minimal install that just requires the first CD by performing the following two steps during the installation:
** During the category/task selection, deselect all package categories, and choose the “Customize now” option at the bottom of screen.
** During the customized package selection, deselect everything ( including the Base group ).
– There are reports that more than CD 1 is required in the following case:
** If you use some software raid options (this will also require CD 2 and 5)
** If you use encrypted filesystems
– When the anaconda installer notes that additional disks will be required but you desire a one CD install, the quick answer is one or more of the following approaches:
** Trim back and do a minimal install. Then once the install is up and running, pull in more packages with yum and add more options later.
– If you want to avoid using more than one CD but want to install more than just the minimal set of packages, you could also consider doing a network installation. A network installation ISO (called boot.iso) is available from the 5/os/<arch>/images/ directory on CentOS mirrors.
– This latter mode of installation, however, is only really reliable via a LAN (an Intranet installation) and not via the Internet.

From my practice, you MUST follow the de-selection order. Otherwise, it will still require other CDs. The actual installation lasts for about 1 minutes(installation of *.rpm files). After reboot, the system gives you a minimum installation with only text mode support. Now login with your root account, and make sure your network is ready. Additional components shall be installed manually using yum:

NOTE: All group names are case-sensitive.

Actually, if only “X Window System” are passed to yum, you will get a simple GUI with an xterm and an xclock after running “startx” command.

You may want to take coffee during the process. For me, about 350M contents were downloaded. Reboot when finished and add “single” option to enter single mode in GRUB menu.

Since the first CD does not install GUI contents, so the runlevel is set to 3(text mode) by default after installation. We should switch it to 5(GUI mode) by editing /etc/inittab file, Find the line and change the middle value from 3 to 5:

Now, we want to start the “firstboot” configuration utility to simplify our user account creation and other initial configurations. Check /etc/sysconfig/firstboot file, and make sure the value is set to “YES” like:

If the value is “NO”, the “firstboot” utility is skipped and GDM is displayed directly. When all have been done, issue the “exit” command to return to the normal startup process. This time, the “firstboot” wizard should show.

Here is the GDM screenshot after all above steps:

centos5_gdm

PS:

In 6.x, CentOS provides LiveCD and LiveDVD that can be used also for installation. But in 5.x, they can only be used for trial experience.

In 4.x/3.x, the openoffice suite is outdated, I suggest to not install them. I also suggest to remove redundant kernels:

There’s 4.9 release but no 4.9 *.iso images. The readme.txt says:

– The upstream provider did not respin media for the 4.9 release and therefore the CentOS project will also not respin our install media.
– Installs moving forward will be off the 4.8 media and an upgrade will move you from version 4.8 to version 4.9.
– We do this to maintain compatibility with 3rd party kernel drivers which are designed to be installed as part of the installation process.

Run “yum update” to update from 4.8 to 4.9. For me, about 300M contents were downloaded.

In 3.x release, I suggest to select “Kernel Development” group during installation. The 2.4.x kernel needs its source to compile kernel modules(like virtual machine addons).

By default, You need to guide Vim to decode double-byte encodings like GBK and Big5. The default Vim configuration only works well with Unicode encodings including utf-8, utf-16, utf-16be etc..Edit your .vimrc file, add line like:

Now Vim is able to detect and decode GBK and Big5 encodings automatically. And according my experience, Vim respects utf-16 and utf-16be files only they have BOM byes. Otherwise, these files are wrongly decoded. In this case, you may want to manually reopen the file using a correct encoding. The Vim command like:

And Vim does not store BOM when saving by default. To enable/disable BOM saving, use:

I’ve attached a series of text files to learn the usage. These text file all contains string “123你好”, but saved in different encodings. Let’s list their code points first:

1 2 3
GBK 0x31 0x32 0x33 0xc4e3 0xbac3
Big5 0x31 0x32 0x33 0xa741 0xa66e
Unicode 0x31 0x32 0x33 0x4f60 0x597d
UTF-8 encoded 0x31 0x32 0x33 0xe4bda0 0xe5a5bd

And our hexdump’s here, note the byte order:

My test text files are here. More info:

The objective of this article is to make Vim your programmer’s editor.

First, a normal version of Vim should be installed to enable syntax highlighting. The default installation of Ubuntu 10.04 only contains a compact version “vim-tiny”:

Then copy a local vim configure file:

1. Line Number

Add line into the .vimrc file:

A similar command can be used to show/hide line number when editing on the fly:

Related help:

2. Tab-space Conversion

From the Vim help:

'tabstop' 'ts'          number  (default 8)
                        local to buffer
        Number of spaces that a  in the file counts for.  Also see
        |:retab| command, and 'softtabstop' option.

        Note: Setting 'tabstop' to any other value than 8 can make your file
        appear wrong in many places (e.g., when printing it).

        There are four main ways to use tabs in Vim:
        1. Always keep 'tabstop' at 8, set 'softtabstop' and 'shiftwidth' to 4
           (or 3 or whatever you prefer) and use 'noexpandtab'.  Then Vim
           will use a mix of tabs and spaces, but typing  and  will
           behave like a tab appears every 4 (or 3) characters.
        2. Set 'tabstop' and 'shiftwidth' to whatever you prefer and use
           'expandtab'.  This way you will always insert spaces.  The
           formatting will never be messed up when 'tabstop' is changed.
        3. Set 'tabstop' and 'shiftwidth' to whatever you prefer and use a
           |modeline| to set these values when editing the file again.  Only
           works when using Vim to edit the file.
        4. Always set 'tabstop' and 'shiftwidth' to the same value, and
           'noexpandtab'.  This should then work (for initial indents only)
           for any tabstop setting that people use.  It might be nice to have
           tabs after the first non-blank inserted as spaces if you do this
           though.  Otherwise aligned comments will be wrong when 'tabstop' is
           changed.

I will choose to use the 2nd approach, so add:

The auto-indent feature is also useful:

When setting expandtab, a real tab can be input by <Ctrl-v>_<Tab>

Related help:

3. Option ‘modeline’:

If you start editing a new file, and the ‘modeline’ option is on, a number of lines at the beginning and end of the file are checked for modelines. This is simply enabled by adding:

Your C/C++ comment may look like one of the following:

And likely, the Python comments:

Here, ai, et, ts and sw are just abbreviations. And expandtab is an option only in Vim, not Vi.

Read related help by typing:

4. Using Taglist:

There are lots of useful scripts in the Vim website that we can use. But Actually, Ubuntu repository also has some of them included:

After installation, these scripts are just downloaded, but not installed for your Vim. We list available script by typing:

Output on Lucid 10.04:

The Taglist plugin is described here, while OmniCppComplete plugin in next section. Both of them make use of ctags utility. Install it first:

Now install the Taglist plugin to your Vim:

When editing a supported file type, Show the taglist window can be opened by one of the following:

Move your cursor between windows by <Ctrl-w>_w as usual. You may want to add a shortcut to toggle this feature. Add lines to your .vimrc file per official document:

When your cursor hovers on a function, <Ctrl-]> takes you to its declaration, while <Ctrl-t> takes you back.

More help:

5. Using OmniCppComplete:

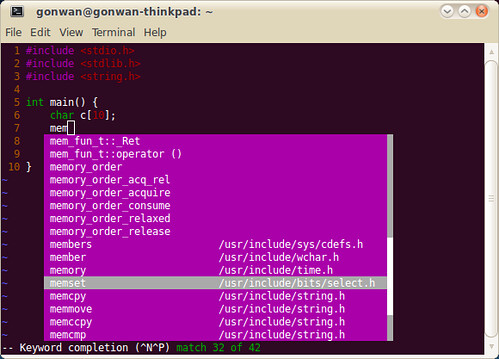
Vim include basic support for code completion. The simplest way is to use <Ctrl-p>. Vim will search your include headers and do insertion. See the screenshot:

vim_ctrlp

The include search path can be set by:

More help info:

Next, Vim provides basic C language completion using ctags. No C++ is supported. Additional languages script can be found in Vim’s autoload directory, say /usr/share/vim/vim72/autoload. But you should generate necessary ctags index files first. For libc6 header files:

And add lines to .vimrc file:

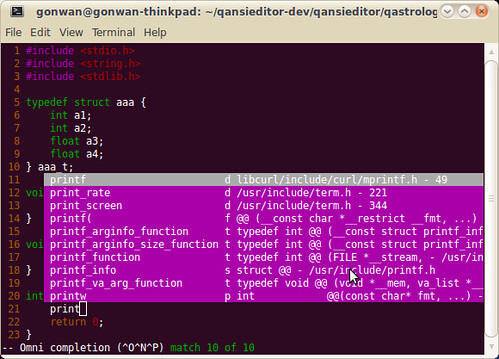
Omni completion can be issued by <Ctrl-x>_<Ctrl-o>.

Screenshot showing function prototype:

vim_omni_c1

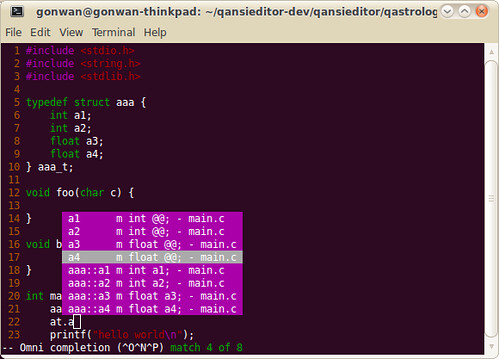
Screenshot showing struct member completion:

vim_omni_c2

More help info:

Note, the ccomplete does not work well in C++ completion. So we need to install OmniCppComplete plugin:

Generate ctags index for libstdc++ and qt4:

And add lines to .vimrc file:

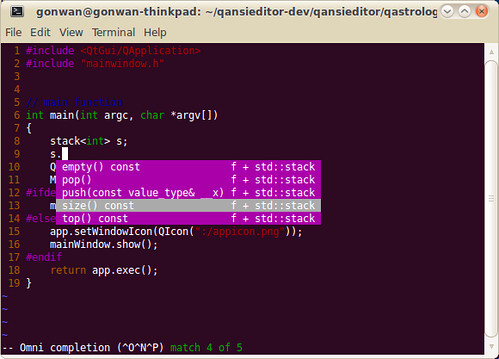
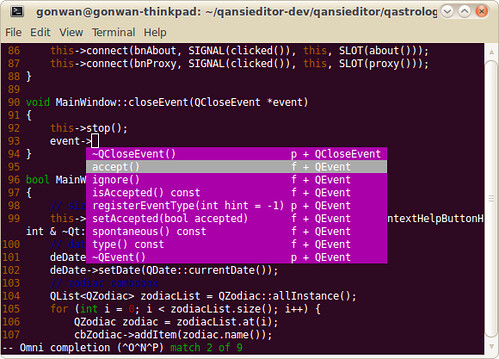
You may encounter problems when completing STL functions. Refer to :help omnicpp-faq and find the solution. Anyway, it works all good for me. Here’re screenshots showing STL and Qt code completion:

vim_omni_cpp1

vim_omni_cpp2

!!!NOTE!!! : The tags file for current file must be generated for OmniCppComplete to work. I’ve set Ctrl+F12 as the accelerate key. Otherwise, you’ll get “Pattern not found” error. More help:

Finally, the list of lines adding to my .vimrc file: