These days, I tried to write C code with OO support. I found GObject is such a well-designed library to simplify my implementation. However, the official documents is not so clear sometimes.  It do not provide sufficient information about all its stuff. I had to write my own demo applications to test the usage of some function. Moreover, the source code were also checked for reference.

There are 3 types in GObject type system: Fundamental, static and dynamic. Fundamental types are top-most types. The do not have parent types. They are seldom used, since all fundamental types are pre-defined rather than user-defined.

In this article, I will try to define a fundamental type using in GObject.Here’s the code on how to register a basic fundamental type in GObject, and how it can be used.

NOTE: PLEASE READ ALL COMMENT CAREFULLY.

My fundamental type is created by calling g_type_register_fundamental() function. A GTypeInfo and a GTypeFundamentalInfo struct are passed as parameters. And here comes the linux Makefile. You can use pkg-config to replace my include and lib paths:

NOTE: REPLACE THE WHITESPACE WITH TAB IN MAKEFILES, IF YOU COPY THE CODE DIRECTLY.

The fundamental type is of no use at all presently. In the next article, I will extend my code to add class meta info.

All source code is available in my skydrive: http://cid-481cbe104492a3af.office.live.com/browse.aspx/share/dev/TestOO. In the TestGObject-{date}.zip/TestGObject1 folder.
From wikipedia http://en.wikipedia.org/wiki/WebDAV:

Web-based Distributed Authoring and Versioning (WebDAV) is a set of methods based on the Hypertext Transfer Protocol (HTTP) that facilitates collaboration between users in editing and managing documents and files stored on World Wide Web servers. WebDAV was defined in RFC 4918 by a working group of the Internet Engineering Task Force (IETF).

The WebDAV protocol makes the Web a readable and writable medium, in line with Tim Berners-Lee’s original vision. It provides a framework for users to create, change and move documents on a server (typically a web server or “web share”). The most important features of the WebDAV protocol include:

  • locking (“overwrite prevention”)
  • properties (creation, removal, and querying of information about author, modified date et cetera);
  • name space management (ability to copy and move Web pages within a server’s namespace)
  • collections (creation, removal, and listing of resources)

I used Apache to experience the WebDAV. The server was built and installed from source with:

The “prefix”, “layout”, “mpm” switch is not necessary, since these are the default values under Unix. Now modify the configure files to support WebDAV access:

The “var” and “uploads” directory, the “DAV-upload” realm, “user.passwd” file, “user” and “admin” user account are referred by “conf/extra/webdav.conf”. While the “daemon” user and group are referred by “conf/httpd.conf”.

Then modify “httpd.conf” to include “webdav.conf” the apache server. It a single include directive. Now start the apache server by running:

Our WebDAV directory is /uploads. So here’s the address on how to access it:
– In nautilus: dav://192.168.1.100/uploads
– In konquer: webdav://192.168.1.100/uploads
– In windows: Go to –> My Network Places –> Add a network place –> Internet or network address –> Enter (http://<user>:<password>@192.168.1.100/uploads) –> Finish!

This article borrows hugely from: http://labs.qt.nokia.com/2010/12/17/experimental-packages-for-symbian-development-on-linux/

First, there’s Qt SDK and Nokia Qt SDK. In a word, Qt SDK is for desktop development, while Nokia Qt SDK is for mobile development. A detailed comparison can be found here.

Then, there’s S60 SDK. Is it necessary to install it before developing symbian applications? The S60 SDK is only available under Windows platform. Under Windows, Nokia Qt SDK is an all-in-one package. It includes S60 SDK, Qt SDK, QtSimulator and a Symbian compiler. So, the AIO package is recommended. There’s another choice under Windows: S60 SDK + Qt for Symbian. The Symbian version can be found here. But this time, there’s no simulator.

As mentioned here, These two SDK will be merged in Nokia Qt SDK 1.1.

Now, we will have our Linux tutorial for Ubuntu.

1. Download and install the following packages (32-bit versions only):
* gcce-4.4.172-r1.deb
* s60-sdk-5.0.deb
* runonphone-4.7.1.deb
* qt-symbian-libs-4.7.1-r1.deb (Old version: qt-symbian-libs-4.7.1.deb)

2. Install App TRK on your phone. It’s a debug service. Find *.sisx files here. Check the TRKPackages.xml file to get correct version for your phone. For my C5-03, I used s60_5_0_app_trk_3_2_7.sisx.

3. Install Qt libs for Symbian. They can be found at Qt’s ftp site: ftp://ftp.qt.nokia.com/pub/qt/symbian/. I installed version 4.7.1 as the developing library. Here’s what exactly each *.sis package contains:

* fluidlauncher.sis
Contains around 10 different Qt demos. Depends on Qt and Open C.
* qt.sis
Contains the Qt libraries Symbian Signed for Nokia phones. Depends on Open C.
* qt_selfsigned.sis
A self-signed version of the above library. Works on other phones such as the Samsung i8910.
* qtwebkit.sis
Contains the QtWebKit library Symbian Signed for Nokia phones. Depends on Qt.
* qtwebkit_selfsigned.sis
A self-signed version of the above library. Works on other phones such as the Samsung i8910.
* qt_demos.sis
Contains qt.sis, qtwebkit.sis, fluidlauncher.sis and Open C all in one convenient package. No other dependencies.
* qt_installer.sis
Contains qt.sis, qtwebkit.sis and Open C all in one convenient package. No other dependencies.

Installing qt_installer.sis is enough.

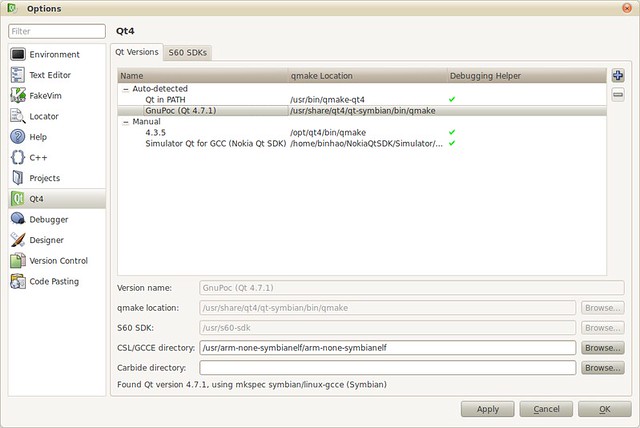
4. Configure your QtCreator, add QtSimulator and QtSymbian versions. The Qt4 page should be something like:

qt_symbian_1

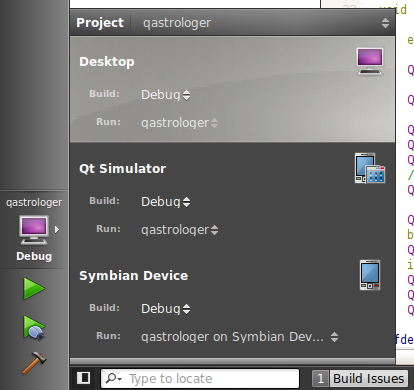
5. Now, create a simple GUI application and add desktop/simulator/device targets, so that you can run on all of them.
qt_symbian_2

6. Run on phone.

When App TRK is installed, connect the phone to the PC using the USB cable. Select “PCSuite” as connection type. Then run App TRK on the phone, and make sure that the connection type is USB. This can be changed under the Settings menu entry. If necessary, choose Connect from the menu.

On Linux, phone should appear as the /dev/ttyUSB1 device, however if you are running an old kernel, you may need to force the USB module to be loaded correctly before the device will appear:

Note the identifier on the line where your Symbian device appears. Then execute the following, using the first and second part of the identifier in place of XXX, respectively.

For my C5-03, It’s:

The rmmod step may fail if the module is not already loaded, but that is harmless.

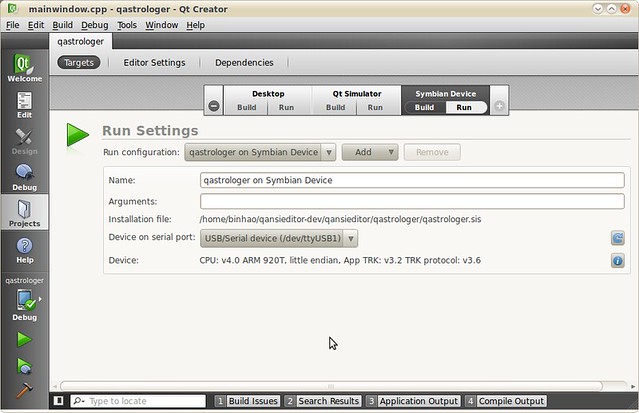
In QtCreator, go to Projects –> Targets –> Symbian Device, refresh the serial port, select USB1 and connect to your phone.

qt_symbian_3

Congratulations! you’ve done. Select Symbian device as your target and click run button. This will package, deploy and run your application on your phone. Simple, Huhhh?

    This article applies to Ubuntu 8.04/10.04. I referred to the instruction here: http://ubuntuforums.org/showthread.php?t=51003. And I’ll use my qastrologer project to demo the building procedure.

1. Install build tool packages:

2. Get the source package, exact it into ~/packages/qastrologer. The directory structure should like: ~/packages/qastrologer/qastrologer-<version>/<source>. The <source> directory contains your *.pro file.

3. Add install section in *.pro file. Otherwise, the built package contains not binary:

I referred to the guild here: http://wiki.maemo.org/Packaging_a_Qt_application. For more information on how to use the INSTALLS macro, refer to the Qt document: http://doc.trolltech.com/4.7/qmake-environment-reference.html#installs

4. Run dh_make. This will create the basic debian package structure.

We are generating a single binary package and licensed with GPL. After running the command, a “debian” subdirectory is created. Now we need to fill in more useful infomations.

5. “rules” file:

It is the most important build script. The cdbs already have support for building QMake projects. Our “rules” file is simple:

Last line ensures we use Qt4. I referred to the source of minitube project. You can access it via:

6. “control” file:

This file controls build and binary dependency. For my qastrologer, the default values are enough. You may want to have some minor changes in “Section”/”Priority”/”Maintainer” values. Since I want to keep my package installs from 8.04 to 10.04 and above, I must specify the minimum dependencies manually to use Qt 4.3. So my “control” file looks like:

Note, the default “control” file uses “${shlibs:Depends}” and “${misc:Depends}” macros to generate binary dependencies automatically. Refer to the man page of debhelper to get more information.

7. Fill in “changelog” and “copyright” files.

8. Build the package:

For full build of the package (build source, deb, clean…) run:

Instead if you have a big package, you can also build only the deb file with:

As starting with version 4.4, the size of Qt source grows extremely fast. It take hours or even a entire afternoon to build it with full feature enabled. Since I do not use advanced features like Webkit or Phonon, I always build Qt with them disabled. I will show and explain my configure parameters in 4.3 and 4.6 in both windows and linux build in this article.

Windows Build

v4.3, just disable the qt3support module:

v4.6, more modules are disabled:

Qt4.4 added concurrent, webkit, phonon and xmlpattern code, and the format of help files was changed.

Qt4.5 added the gtkstyle. In configure script, -make and -nomake switch are added. But official support for VC6 and VS2002 were dropped. Actually, VC6 generates incorrect code.

Qt4.6 added javascriptcore backend for QtScript module. So I added the “-no-script” switch.

Maybe you have noted, there’s no “-no-make” switch exists before Qt4.5. So, how to exclude building of demos and examples? I looked into the v4.5 source code of configure.exe(located in $QTSRC/tools/configure), and found all “no-make” parts are just excluded by writing to a .qmake.cache file. After running configure, the .qmake.cache file may have a line like:

Now just keep the first 2 entries.

Linux Build

From v4.6, there’s only one all-in-one source package, no separate platform-specific source packages are provided. I firstly chose the qt-everywhere-opensource-src-4.6.3.zip. But even its configure script did not run. Finally, I found it’s a line ending issue, and we need to convert it first using dos2unix utility.

Now convert line endings:

The first 3 lines ensure running of configure script. The last line ensures correct generation of makefiles. Without it, no separated debug info are generated and you may also encounter errors when linking the assistant application as described in QTBUG-5471. The qt-everywhere-opensource-src-4.6.3.tar.gz with *nix line endings does not need above steps and may have less undiscovered build issues.

I’ve tested this approach under Hardy(Ubuntu8.04) and Lucid(Ubuntu10.04). Under Lucid, the dos2unix/unix2dos utility seems to be renamed to fromdos/todos. Just replace the command name.

We can configure it now:

v4.3, as easy as windows:

v4.6, we do not have s60 and gesture switches:

After running configure, modify the .qmake.cache file to remove unnecessary entries.